How to install a storm or screen door closer
Replacing a door closer is an easy DIY job that you should be able to complete in under 10 minutes. The trickiest part is making sure you identify and choose the right replacement door closer.
Today we're going to show you how to choose and install a pneumatic storm or screen door closer.
These instructions are pretty standard, and will apply to any pneumatic (and many hydraulic) door closers on the market, including those from Wright Products, Barton Kramer, Prime-Line, Stanley, and of course Ideal.
What size storm door closer do I need?
Door closers come in a variety of strengths, and some offer special features. At Ideal Security, we've got a complete range of pneumatic door closers for storm and screen doors. Before getting started, let's make sure you've got the right one. Start with this handy selection guide, and read on for more details.
![Door_Closer_Replacement_Guide_-_What_Size_do_I_Need_(EN)[1]](https://idealsecurityinc.files.wordpress.com/2017/04/door_closer_replacement_guide_-_what_size_do_i_need_en1.jpg)
There are three classes of storm door closer:
- Standard
- Heavy
- Heavy with Torsion Bar.
The manufacturer of your door chose the best closer for it, based on weight, thickness, frame material, and the amount of glass in the door. You should always replace your existing door closer with one of the same class.
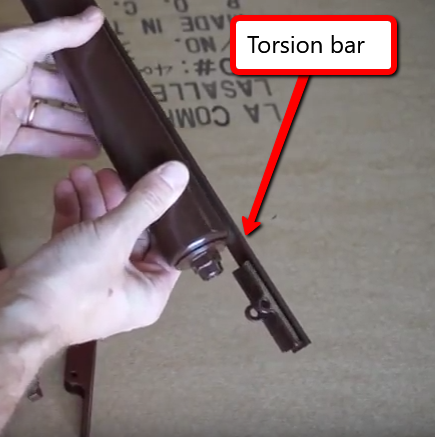
If your door closer has a torsion bar, like this, you need a Heavy Closer with a Torsion Bar.
If it doesn't, you'll need to measure the diameter of the tube.
- Standard door closers have tube diameters of one and a quarter inches
- Heavy door closers have diameters of one and half inches
All of our door closers come in regular and quick-hold variations, and some include storm chains as well.
Below we offer instructions for installing standard or heavy door closers, with and without torsion bars.
Installing a door closer without a torsion bar
Most storm and screen doors use door closers that don't have torsion bars.
- Start with the door closed
- Determine the position for the jamb bracket. The straight edge of the bracket should be 2 and one eighth inches away from the door. Make sure the bracket is facing the right way, with the straight edge away from the door.
- Install the jamb bracket, using the 4 longer screws. If you’re not using the existing holes, you may want to drill pilot holes to avoid splitting the wood of your door frame.
- Now open the door, and slip the hold-open washer onto the rod.
- Attach the door closer to the jamb bracket, using the shorter of the two pins.
- Pull open the door closer a bit. Slide the washer past the "lugs", lining it up with the mark on the rod. Release the closer, so that the washer is now holding it open.
- This is called "pre-tensioning" the closer
- Next, rotate the door closer if necessary so that the pin-holes are on the side closest to the door. Attach the door bracket to the tube, using the longer pin.
- You’ll see there are two pin-holes on both the door closer and the bracket. Make sure to use the holes at the far ends.
- Close the door, and line up the bracket so that it's touching the door. If you need to drill new holes, mark the hole positions. Note that this bracket can accommodate a wide range of screw-hole positions, so if you have existing holes on your door, you should be able to re-use them.
- Install the bracket on the door, using the 2 shorter screws. This may be easier if you first remove the bracket from the closer.
- Re-attach the closer to the bracket.
With the door closer installed, skip down to Testing and Adjusting.
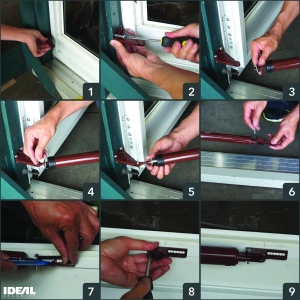
Installing a door closer with a torsion bar
The heaviest doors (those with the most glass, usually) require a door closer that has an additional torsion bar to help snap it shut at the very end.
Here's a quick frame-by-frame demonstration, or you can skip to the full video below. |
 |
- Start with the door closed
- Determine the position for the jamb bracket. The straight edge of the bracket should be 2-1/8" away from the door. Make sure the bracket is facing the right way, with the straight edge away from the door.
- Install the jamb bracket, using 4 screws. If you’re not using existing holes, you may want to drill pilot holes to avoid splitting the wood of your door frame.
- Now open the door, and slip the hold-open washer onto the rod.
- Attach the door closer to the jamb bracket, using the closer pin.
- Pull open the door closer a bit. Slide the washer past the "lugs", lining it up with the mark on the rod. Release the closer, so that the washer is now holding it open. This is called "pre-tensioning" the closer
- Close the door, and line up the bracket so that it's touching the door. If your existing holes don't match up, you may need to drill new ones
- Install the bracket on the door. Note how the torsion bar flexes as you secure the bracket on the door.
Testing and Adjusting
With the installation done, let's test the door closer.
- Open the door, and release the washer. Remember, we had it pre-tensioned. If your door closer includes a spring-loaded speed-release washer, it will release itself automatically when you open the door.
- Let your door close. It should shut smoothly and securely.
Adjusting the tension
If your door doesn't close, or the speed is too fast or too slow, you can adjust the tension on the door closer.
There's a tension screw at the front end of the door closer. Turn the screw counter-clockwise to have the door close faster or harder. Turn the screw clockwise to have it close more slowly.
Seasonal adjustment
Some door closers also feature a seasonal adjustment.
In the standard installation position, the door closer is set for a door with a glass window.
If you remove your window in the summer, your door will be lighter. You can account for this by using the second pin-hole on the tube to attach it to the door bracket.